Getting Started with Mailchimp and Cobot
A few years ago, I was serving as Director of Technology for the Port Workspaces, a multi-location coworking space in Downtown Oakland. I had just returned from Berlin after working on some other interesting projects and wanted to continue helping coworking spaces streamline their operations.
The Port had a little over 400 members across 3 spaces (at the time) and lots of events, workshops and happy hours happening. We had roughly 1 community manager for every 100 members (12 different plans!), so as we scaled, my team would need easy solutions launched to quickly communicate with their members in a targeted way.
Obviously, we’d have to craft different messages to the different segments of our members — but how to do this? Cobot is great for sending one-to-one messages and even group messages, but what about recurring email campaigns? Upcoming events that we wanted to get out to our members?
Where do I even start 🤔?
Enter Cobot’s Mailchimp Add-on.
Cobot’s Mailchimp Add-on
If you’ve already signed up with us, you’ll find that Cobot integrates with lots of other services and Mailchimp is one of them 🐵.
It’s super easy to set up once you’re logged in:
- Go to the Mailchimp add-on under Add-ons > Available Add-ons
- Select your space
- Add your list
- Put in an API key from your account on Mailchimp which you can find under Account > Extras > API Keys.

- Select the Mailchimp list you would like to connect to.
- Sweet. Current existing members and future members will now be added to your list.
However, this happens only if your members have double-opted in. Read on…
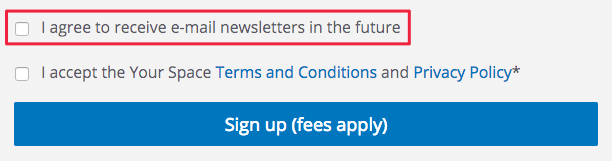
A Note About the EU’s General Data Protection Regulation
For your members to be added to Mailchimp, they’ll need to double opt-in as part of the EU’s General Data Protection Regulation (GDPR). As the first opt-in step, there is a checkbox on signup where user can choose if they agree to receive such e-mails in the future (this can also be changed in the settings later). Without this approval, it’s not possible to add a member to any list:
Segmenting Your Space’s Data
Now check this out: once your members are added to your Mailchimp list from Cobot, the integration automatically brings in five data points:
- First name
- Last name
- Plan
- Date added
- Last changed
You can view this within Mailchimp under Lists > Select your Cobot synchronized list.
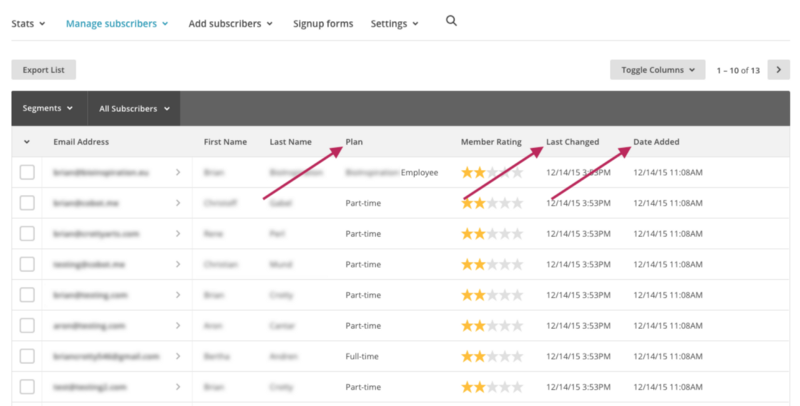
See that ‘Plan’ in the 4th column? That’s what we’ll use to create segments.
Hot tip: Use Mailchimp’s Segments instead of Lists. Mailchimp charges by the number of emails you have on your account and counts individual emails of all your lists towards that number — even if the same email is on multiple Lists.
Segmenting Your Mailchimp List
To define and save a Segment, you can follow these simple steps:
- Select Segments > Create a Segment
- Select the sorting type (in this case, your Plan) and the value it should match (‘flex desk’, part-time or however your plans are named)
- Preview the segment to ensure it is including the correct information, then click Save as Segment.
- Name the segment and make sure to keep the auto-update box selected.
- Done!
Now when you need to send a recurring or marketing email to your members, you can set it to send to your specific segment.
If you’d like to get in to the details of this Mailchimp integration — check out our detailed guide on targeted marketing using Cobot’s Mailchimp Add-on.
If you aren’t already using Cobot as your coworking management software, give it a go! You’ll find that our features can help you run your coworking space more effectively and grow your community. Just sign up for a free trial or a live demo session. And if you have questions, our support team is all ears!
Happy Coworking!